Grafting multiple tomatoes has the potential to raise your harvests per plant over the harvesting period significantly. For smallholder farmers, maximizing yield is very important because of the small number of plants you may have planted in the garden. Once you have acquired the skills for grafting multiple tomatoes, you are guaranteed a good harvest minus the extra cost of sourcing seedlings from private companies.
Preparing and grafting multiple tomatoes could help smallholder, and large-scale farmers raise their income status and get better yields. Getting to a bounty harvest requires some skill and techniques to prepare the best grafts for planting.
Once you know your way around it, grafting multiple tomatoes could be quick and cheap. The main steps involved are:
- Clean the area to be used and bring your materials there. These are the rootstock and the scions and the grafting materials.
- Cut the scion and the rootstock at the grafting site and join them together.
- Finally, keep your freshly grafted tomatoes in a healing chamber to allow them to heal. Do not rush to plant them in the field before they are properly healed.
Preparation for grafting tomatoes
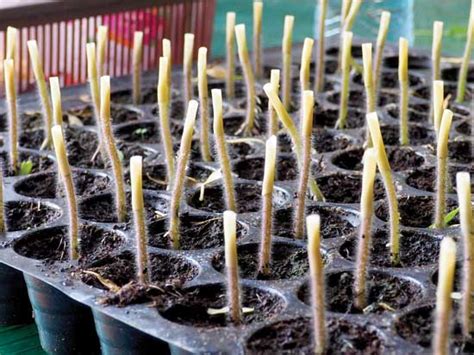
The first thing you need is the right seeds to grow your rootstock and scion. The rootstock and the scion should be genetically compatible for the graft to be successful. You will have the most success using tomato on tomato varieties. For example, you have a wild tomato rootstock to help with water stress and scions from a high-yielding tomato variety. You should also pick only vigorous seedlings which have no disease to use for grafting.
You also need to prepare the following materials:
- New razor blades or scalpel
- Grafting clips (could be homemade), glue or strips to hold the graft in place
- Alcohol, detergent, bleach or a commercial disinfectant for the hands. You will aslo need gloves for sanitaion.
- A climate controlled space such as a greenhouse. However, if you werw to do it outside, you have to be very careful. Such spaces will be crucial for healing and aclimation.
Steps for grafting multiple tomatoes
Around 17–21 days after planting the seed, they will be ready to graft. You can test their readiness by placing a grafting clip on the stem of a seedling. If it fits snugly, then they are the right size for grafting.
You begin the process by cleaning your hands, putting your gloves on, and cleaning the work area and equipment with detergents and alcohol. Your seeds should also be high-quality, clean, and treated. To be sure, you may treat the seeds with hot water and chlorine.

During grafting, hygiene is critical because if you pick up a pathogen on your hands or equipment, you risk spreading it to all of your plants. Due to the Tobacco Mosaic Virus risk, do not smoke while grafting or near recently grafted plants. Before you begin grafting, clean your workspace. Always begin with a fresh set of blades and grafting clips.
Grafting multiple tomatoes can only be successful if you use healthy rootstock and scion seedlings. Also, try matching rootstocks to scions of matching diameters to increase compatibility.
There are various techniques to graft tomatoes, such as two cut grafting and cleft grafting methods, used in the example below. Take the rootstock and measure 5mm below the cotyledons. Cut the rootstock horizontally using the sharp blade you had cleaned earlier. Bisect the truncated rootstock stem to a depth of 4 mm at its largest diameter.
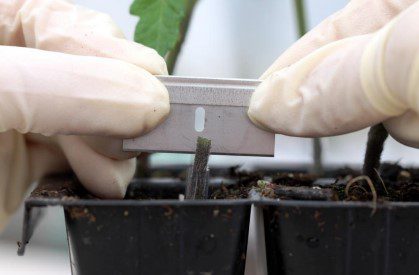
Take the scion seedling and cut scion seedlings horizontally about 5 mm above the cotyledons to remove the roots. Shape the cut surface of the scion seedling into a wedge with sides that are approximately 4 mm long. (In the two-cut technique, two diagonal cuts at a 65-degree angle detach the scion from its roots and make the wedge simultaneously.

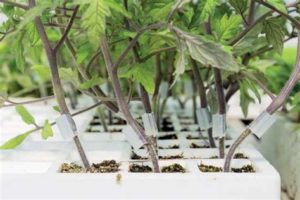
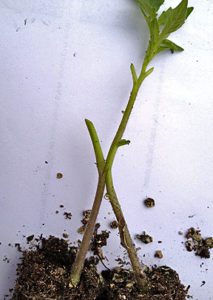
Insert the cut scion into the vertical cut that you made on the rootstock. Use a clip, tie, polyethylene strip, wire, glue, or other clean material to secure the graft.
Healing multiple tomatoes

Keep fresh grafts in a climate-controlled room with humidity at 90%. Preferably, a room or structure covered in plastic for about 5 to 7 days. The plastic should allow 50% light. If it cannot, place a shade cloth over it. The shade cloth also helps keep the temperature between 18-21 degrees Celsius (day) and 16-18 degrees Celsius (night). Remember to water from the bottom to alleviate stress on the graft union and lessen the risk of deterioration.
Once the grafted seedlings are about a week old, please place them in a second chamber with about 50% humidity. At two weeks, you should begin acclimatizing the grafted seedlings to the light, temperature, and humidity conditions in which they will grow.
Summary
Once you’ve mastered the art of grafting several tomatoes, you’ll be sure of a good yield without the added expense of purchasing seedlings from private companies. Because of the limited number of plants planted in a smallholder farmer’s garden, boosting production is critical. Grafting multiple tomatoes improves the plant performance and dramatically increases your harvests per plant throughout the harvesting season.


[…] How To Start Grafting Multiple Tomatoes For Better Yields […]
[…] Read More: How To Start Grafting Multiple Tomatoes For Better Yields […]