90% of tomato diseases come from the soil. Deadly diseases such as bacterial wilt attack from the roots and move upwards through the stem. With side grafting, you can connect the scion of a tomato variety with desirable qualities like fruit size and flavor to the roots of a variety with disease resistance and rapid root growth.
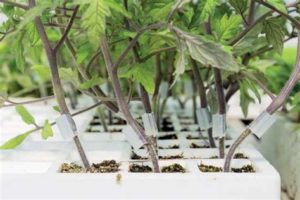
Side grafting tomatoes combine resistant roots with susceptible stems. It provides a barrier to diseases that come from the soil. You can use seedlings with similar diameters or seedlings that have grown too large for top grafting. You attach the scions or cut stems, to the roots using a grafting clip. Wait for healing.
Benefits for organic farmers…
Organic farmers could benefit immensely from side grafting tomatoes because they rely heavily on manure, soil, and compost which carry many diseases.
Organic farmers run the risk of getting soil-borne pathogens in their roots, unlike novel methods which use sterile media to keep diseases at bay.
Side grafting tomatoes take a long time to get ready, but the success rate is higher because you retain both roots.
Say you leave them to heal in the greenhouse or healing chamber, but the conditions deteriorate, and the grafted seedling retains its original set of roots to help acclimatize it.
Readying your seeds and seedlings

Rootstocks typically have long and thin stems. It would help if you planted them before the scion seeds so that most of them reach a compatible size when it is time to graft.
To increase the chances of getting the suitable sizes, you can plant rootstock seeds in sequence over several days.
Side grafting tomatoes require stems that are 2 to 3 mm in diameter. Grafting is quite restrictive in this sense. At that diameter, plants usually have 4 or 5 genuine leaves visible, depending on the conditions.
Grafting plants thinner than 2 to 3 mm is physically challenging, and the success rate drops dramatically as the stem diameter grows.
Read More: Can Tomato Grafting Make Your Tomatoes Stronger?
Side grafting phase
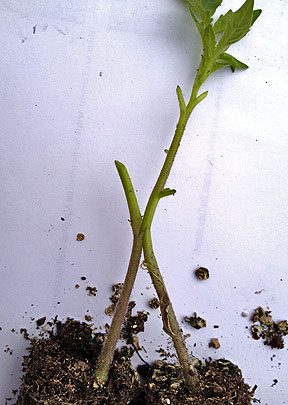
- You first select two large healthy seedlings with similar stem diameters of between 2 to 3 weeks old. The stem diameter must be large enough to execute the graft.
- On the scion, remove the cotyledons and the first genuine leaves. Make a 60-degree angle upward and cut two-thirds through the scion stem, about an inch below the cotyledons.
- Cut off the top of the rootstock just below the cotyledons.
- Also, make a 60-degree downward cut in the remaining stem, about an inch below the first cut, to match the cut in the scion. The cut should be about two-thirds of the way through.
- Insert your rootstock stem up into the scion stem after making the matching cuts. Once you join the two stems, use a side grafting clip to clip the plants together.
- Transplant them into a pot. Hold the two root balls together as you transplant them and water them right away.
- As the graft union heals, leave the scion’s side-grafted roots intact for 4 to 5 days.
- After five days, remove the part of the scion stem linking the original scion root. Only leave the desired rootstock on which the plant will rely.
Removing the original roots all at once results in shock, which might damage the seedlings. To avoid the shock, you should make a partial cut in the stem so the seedling can begin adapting to a reduced supply. Leave it for two days, then cut off the stem all the way through.
Removing the original root is critical because leaving both root systems in place may increase the population of root diseases that can thrive on the more sensitive roots.
Read More: How To Make Perfect Top Grafted Tomato Seedlings
Healing phase

Side grafts take 6 to 7 days to heal. Keep the plants in a shaded area where you can regulate the temperature and humidity.
The healing process requires warm temperatures between 80-85 degrees F with at least 95 percent relative humidity until the grafts heal. Keep the leaves dry to increase the success rate.
For this reason, you can use little stakes to support the seedlings and keep them upright. Also, plastic domes placed over trays of grafted plants appear to improve success.
After seven days, take out the seedling trays or remove any coverings for a few hours early or late in the day to increase light exposure.
A gradual increase in exposure to direct light will harden the seedlings before they are transplanted. This is the right time to open up the plastic dome for extra light.
If necessary, spray the plants once they’re entirely out of the cover to keep them from wilting. Finally, make sure the graft union is above the soil line when planting in the production house. The plant will be susceptible to soil-borne illnesses if the scion roots into the soil.
Advantages of side grafting tomatoes
- Higher success rate. It uses both original and desired rootstock during the healing process, which reduces the risk of shock.
- The diameter doesn’t have to match. Side grafting allows for less consistency in scion and rootstock stem diameters than top grafting, which requires the two stems to be almost identical in size.
Read More
How to make perfect top grafted tomato seedlings