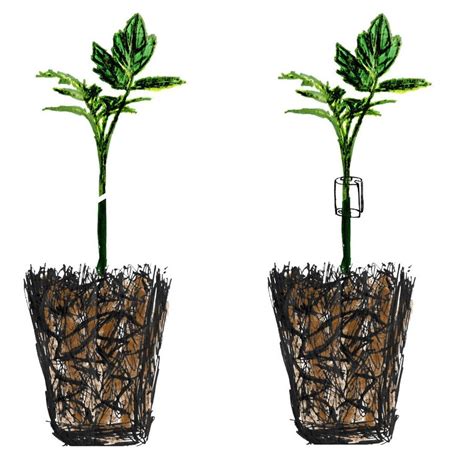
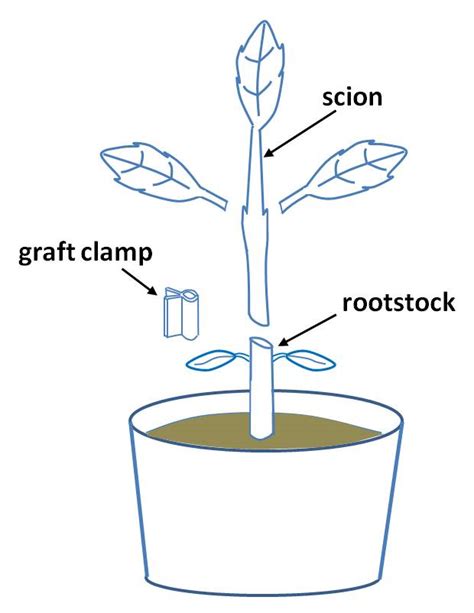
Top grafting tomatoes is a technique where the scion is entirely cut off from its roots and grafted on top of the rootstock stem. You use a thin plastic tube or sleeve to hold the scion and rootstock together until the graft cures.
Two methods are used under top grafting tomatoes: splice grafting (speed grafting) and cleft grafting methods. The splice method is more common and preferred because it only takes a single complete cut through the graft’s root and shoots portions. It is quicker and easier to execute than both cleft grafting and side grafting. The splice top grafting method can work on even the tiniest seedlings.
Planting the seeds
Because rootstock types have long, thin stems, you seed the rootstocks a few days before seeding the scions. In addition, you can plant the rootstock seeds in sequence over several days so that when you are grafting, you have the correct assortment of plant sizes from which to pick.
You start selecting stems for top grafting when the stems are about 2 to 3 mm in diameter. Top grafting tomatoes use a limited range of plant sizes. Plants at this diameter have 4 or 5 genuine leaves growing on them, depending on the conditions. Any plant of a smaller diameter will pose a challenge when grafting and reduce the number of surviving seedlings.
Splice or speed top grafting
To begin, you choose healthy scion and rootstock plants with similar stem diameters. Next, cut the scion from its roots at a 60-degree angle, just below the cotyledons. Then proceed to cut the first set of genuine leaves from the scion, leaving only the highest few of leaves and the cotyledon.
Cutting off a few of the top leaves helps to limit transpiration throughout the healing process. On the other hand, the cotyledon is the food source during the early stages of germination and plant development.
You then cut the top of the rootstock slightly below the cotyledons at the same angle as the scion. (If the plants are too little, make an incision above the cotyledon, but make sure these suckers don’t sprout later.)
When cutting the stem of the rootstock, you can either cut above or below the cotyledons. Cutting the stem above the cotyledons has the advantage of providing greater space between the graft union and the soil. It reduces the likelihood of grafted plants developing adventitious roots from the scion.
Cutting the rootstock above the cotyledons, on the other hand, can result in rootstock regeneration. New stems emerge from the suckers of the rootstock cotyledon, also known as rootstock regrowth.
Place the grafting sleeve over the rootstock stem and carefully push the scion stem into place so that the cut surfaces are in complete contact. If necessary, gently wiggle. Water immediately after transplanting into a large cell tray (72s) or a small individual pot.
Read More: Can Tomato Grafting Make Your Tomatoes Stronger?
Cleft top grafting tomatoes

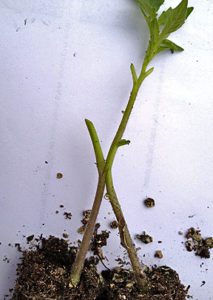
Measure 5mm below the cotyledons on the rootstock. Using the sharp blade, you cleaned before, cut the rootstock horizontally. Bisect the truncated rootstock stem at its maximum diameter to a depth of 4 mm.
To remove the roots from the scion seedling, cut it horizontally about 5 mm above the cotyledons. Make a wedge out of the cut surface of the scion seedling with sides that are about 4 mm long.
Insert the sliced scion into the vertical cut on the rootstock that you made. To secure the graft, use a clip, knot, polyethylene strip, wire, glue, or other clean material described here.
Read More: How to make perfect side grafted tomato seedlings
Healing care
Keep the plants warm (80-85 degrees F) and at least 95 percent relative humidity until the grafts heal after grafting. They should be held in a heavily shaded area, such as under a bench, and misted just enough to keep the humidity at a comfortable level, but not too much. (The leaves don’t need to be wet all of the time; this will diminish success.)

Open the tube on the fourth day to observe if the plants are still moist. During this time, the plants will not require much water. When you finish, close the tunnel.
- Make a small aperture in the tunnel on the fifth day so that some of the humidity can escape, and examine the plants frequently. If they begin to wilt, re-open the tunnel, raise the humidity level, and try ventilating the next day again. Make the hole a little larger on day six if the plants did not wilt when ventilated on day five. When you remove the plastic, increase ventilation gradually so that the seedlings do not wilt.
- The trick is to gradually bring the grafted plants up to regular greenhouse temperature and humidity, but if they begin to wilt, go back to the previous circumstances. Grafted tomato seedlings cannot sustain high humidity levels indefinitely; otherwise, the scion will develop its adventitious roots and fail to unite with the rootstock.
- Top watering before the plants have fully recovered may cause the tops to fall off. The seedlings will eventually be strong enough to be top-watered again. After a few days of re-acclimating to greenhouse conditions, the plants are ready to be handled normally.
Finally, make sure the graft union is above the soil line when planting in the production house. The plant will be susceptible to soil-borne illnesses if the scion roots into the soil.


[…] Read More: How To Make Perfect Top Grafted Tomato Seedlings […]